Friday, April 2, 2010

St. Patty's Day Feast


I can't believe how long it's taken me to blog about the food I made during the week of St. Patty's Day!  I made such good things that week and such good things after.  The recipes are really starting to pile up!  More on that later.

I got the bug to make St. Patty's inspired food, but I'm not actually Irish.  I'm partly of Scottish descent, though, so that's close enough, right?  I'll just jump right in.  This is going to be a long post because I made a lot of food.  And man oh man do I wish I had some of it now.


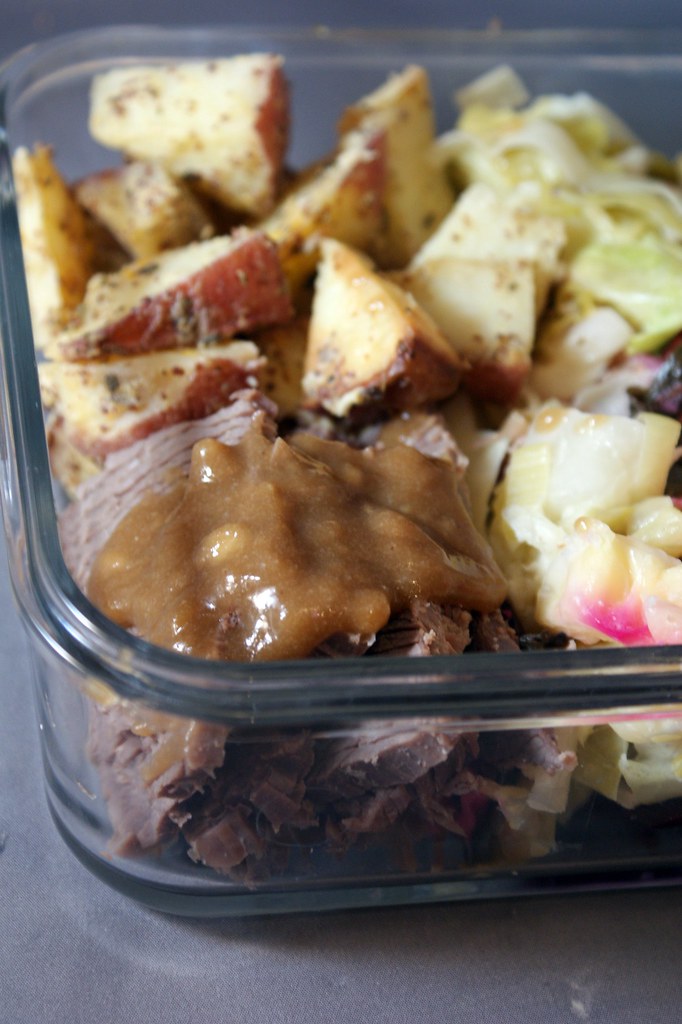
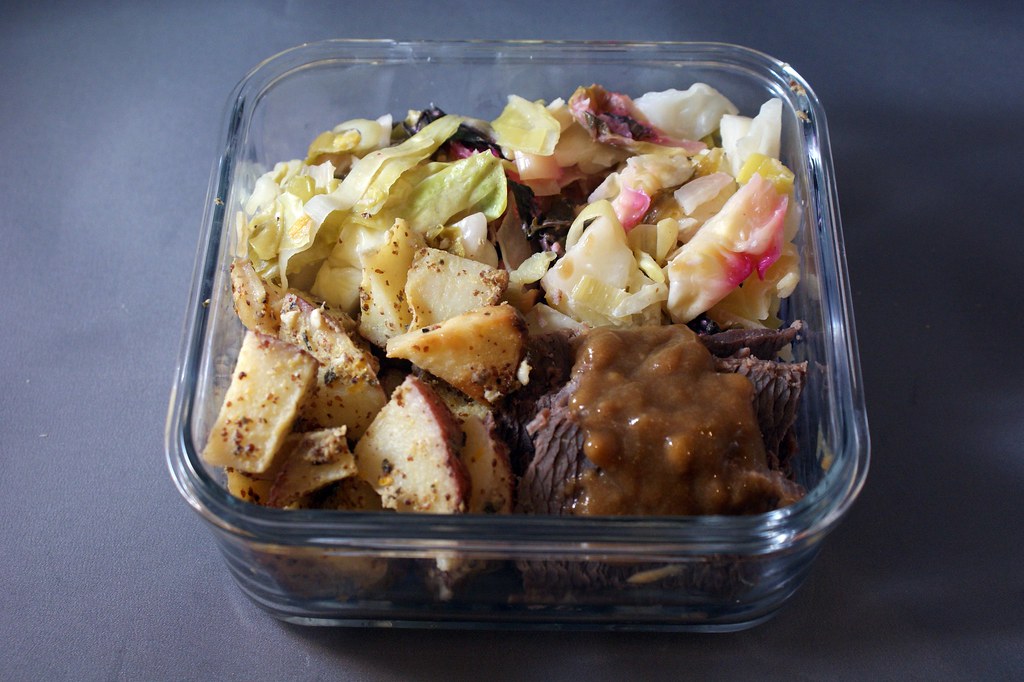
  • Naturally, I started with corned beef!  Yeap, from scratch.  Brined it myself!  I used this recipe, courtesy of Alton Brown for the brine.  I couldn't find juniper berries, so I used fennel seeds instead, and I threw in some dried thyme as well.  I didn't want to just boil the brisket in water, so I used this recipe to braise it in the oven.  After 3 hours I had a flavorful, falling apart cut of meat that was so delicious that when Husband tried it, he lamented there was only 3lbs.  I loved the flavors imparted by the Guinness and beef broth.  I am definitely making this again next year.  Of course, I don't think I'll wait that long to try brisket again in other preparations.  It's yummy!  I love that juicy, falling apart texture. 
  • Let me tell you about this whiskey sauce I made for the corned beef.  See, I had some extra whiskey (more on that below).  And I had all this beautiful braising liquid.  And I wanted something to top the beef.  So I made a roux with a tablespoon of butter and a tablespoon of flour over medium heat.  I added the whiskey and about 2 cups of braising liquid, brought it all to a boil, and let it simmer until it reduced and became nice and thick.  Man of man this sauce was heavenly!  It was smoky from the whiskey and the braising liquid was beefy and complex.  I can still remember what it tastes like, and my mouth is watering.  Try this.


  • Mustard roasted potatoes, courtesy of Smitten Kitchen.  I had made these once before so I knew they would be delicious...and they were!  I love the grainy mustard over these waxy potatoes.  This is my go-to recipe for a healthy flavorful potato.  And how well does mustard go with the rest of this food?  Perfectly.  Yeah.

  • Horseradish cream braised cabbage and beet greens over roasted beets.  I based the cabbage off of this recipe, courtesy of Sassy Radish.  I nixed the leeks because I didn't have any, and threw in the greens from from the beets.  I wanted to work in horseradish because I thought the flavors would go nicely with the beef and mustard from the potatoes, and I didn't want anything too too creamy, so I used about 2 tablespoons of white horseradish and used the same amount of cream.  It kept the dish light and super flavorful.  I couldn't get enough!  I also roasted the beets, sliced them thin, and plopped the cabbage right down on top of them.  Oh yeah.  Sweet, creamy, spicy, and slightly crunchy.  


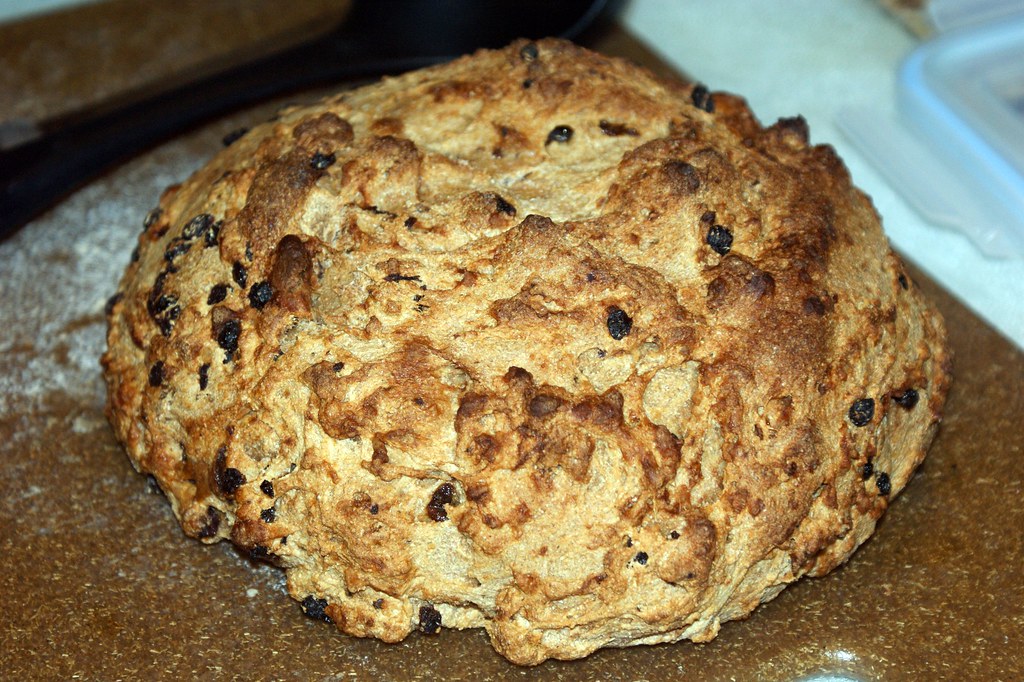
  • Brown soda bread, courtesy of Nourished Kitchen.  This was my first attempt at soda bread.  And seeing as how this recipe called for whole wheat flour and booze, well you know me.  I was there.  Also, I liked that you soak the flour in the buttermilk overnight.  I'm new to this trick, but find it absolutely genius.  Soaking the whole grains overnight helps break down the starches to make them soft and silky.  This turned out really well!  For the most part.  Except I was kinda pressed for time...long story...so I totally undercooked it, and it wasn't cooked all the way in the middle.  But you know what?  I still liked it!  I loved that doughy flavor.  And hello!  The whiskey soaked currants?  Delicious.  I would use more currants next time!  Husband wasn't really so much a fan.  Since it was a soda bread, it didn't have that yeasty flavor he likes.  I would make this again, especially when I want an easy bread without a lot of steps.  And oh yeah, that leftover whiskey I was talking about?  It was from soaking the currants, so it had currant essence goodness in it.  Yum!

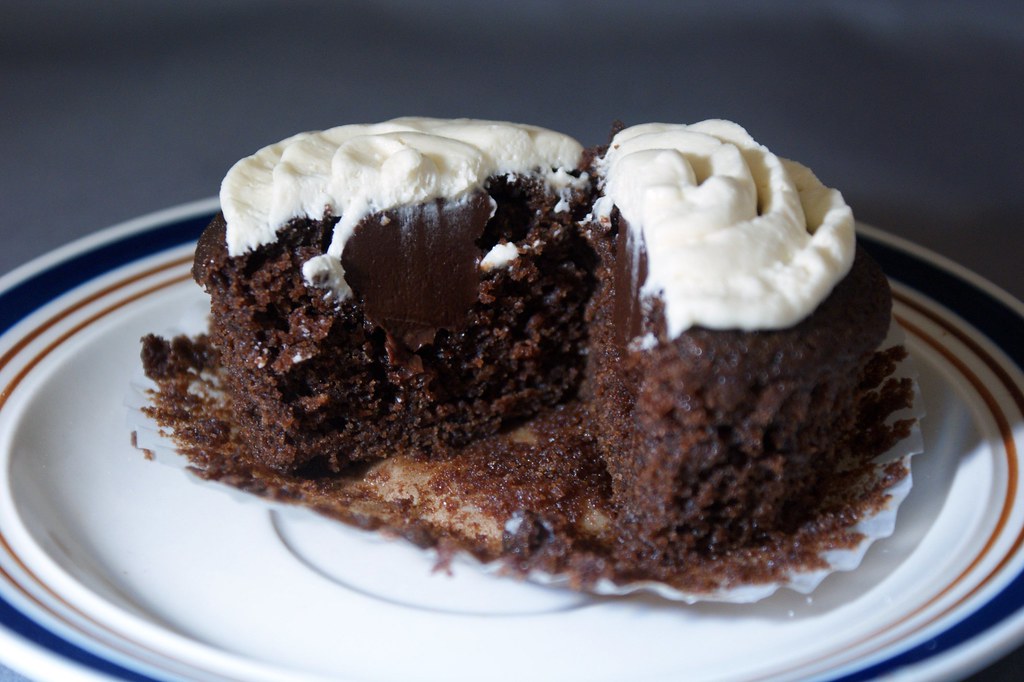
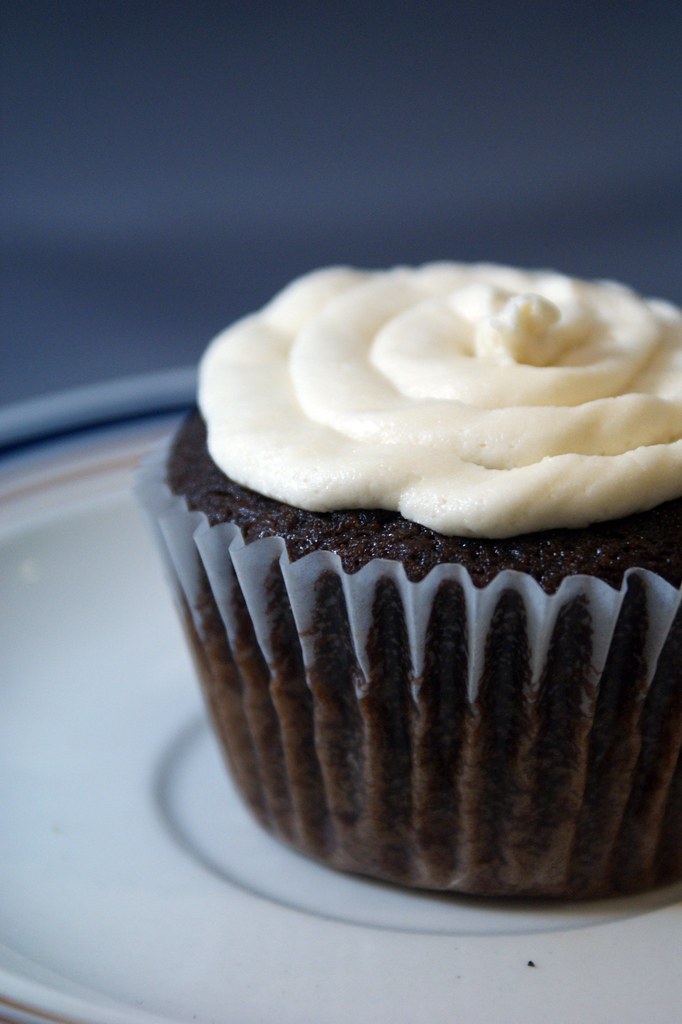
  • And now the piece de resistance!  Smitten Kitchen's Irish Car Bomb cupcakes.  Seriously.  Oh my god.  These are by far the best cupcakes I've ever made...and possibly ever eaten.  Ok, let me walk you through it.  The cupcake is a Guinness chocolate cupcake, so yum right off the bat.  See that little bit of chocolate in there?  That's a whiskey ganache.  And it was amazingly good.  And that frosting?  Baily's frosting.  The frosting made it for me for sure.  It was so good!  But all three together were magical.  These were a hit with everyone I gave them to.  Word spread about them like a wildfire.  And not only did a bunch of people ask for the recipe, one person actually made them herself that very same week!  They're moist and chocolaty, and the alcohols provide a great complexity of flavor.  Love 'em!
How yum does all that sound?  My job may have hung in the balance, but having a lunch like this sure gave me a bit of reprieve:

Monday, March 29, 2010

In Transition

When I'm feeling down, and this is going to sound so corny, but it's totally true, appreciating the small things really cheers me up.  A nice glass of wine.  A good snuggle from my dog.  A gorgeous landscape.  A sweet smelling flower.  People telling me it'll be okay just makes me choke back a snide comment (I'm full of snide comments, so that happens a lot when I talk to people).  People telling me they're sorry makes me feel hopeless.  Pretty much interacting with people when I'm down is the worst cure for me.  I like to be alone.  I like to be around things that don't require a brave face and won't judge me, should the urge to break down in tears strike.  Most of all I like to be around things that remind me I'm small, and my problems are even smaller.

As the weather has definitely made a turn for Spring, I've been outside as much as possible, appreciating all the gorgeous blooming before it gets too hot and everything dies.  Such is Southern California.  Instead of driving hours and hours to the desert, this time I just had to turn my attention to my backyard.

The sweet smell of the Jasmine

One of the sweetest smells, I think, is Jasmine fresh in bloom.  There's just nothing like it.  They used to have Jasmine bushes all over my complex, and when I walked Theo every night I would smell it everywhere.  Because of the high cost of water, they removed all the Jasmine bushes last year and opted for gravel instead.  I was a bit heart broken. But I still have one small bush in my backyard.  I can smell it every time I sit down to play fetch with Theo.

Wedding Freesia

When Husband and I got married 3 years ago we gave Freesia bulbs as a favor.  I wanted something that people could do something with. Something that would last, but not take up space gathering dust on some shelf.  I'm sure most people just threw theirs away (actually, a lot of people didn't take them home at all), but I took whatever was left and planted them in the backyard.  They only stay around for a short time in Spring, but I'm always reminded of my wedding and other barftastic stuff when I see their beautiful bright flowers.


The sun is shining, the flowers are beautiful.  I live in a nice place.  The world is big and complicated, and I am small and simple.  Everything is going to be okay.

Alright, enough with the moping!  If you read my blog, or are friends with me in any way, you can probably guess that I was laid off from my job last week.  I am currently unemployed.  A little panicked.  A little stressed.  But that's not really want I want to talk about right now.  There will be plenty more posts coming down the pipe...seeing as how I have nothing better to do now!  Ha!

So speaking of transitions, changes, and Spring, I have a new risotto recipe to share with you.  Still feeling the change in season, I decided to combine a cold weather-feeling dish with bright spring vegetables.  The results were awesome!  You might have seen the pictures in an earlier post.  They are, unfortunately, truly ugly!

See?  Blogger won't even center this ugly thing correctly.  It's too horrendous.

But don't be fooled!  This risotto was one of the best I've ever made.  I used pearl barley instead of arborrio rice.  I really liked the texture the barley gave.  Each pearl had a bite to it, yet the dish was still creamy and light.  I had seen a recipe for farro risotto with caramelized onions and mushrooms cooked in a balsamic sauce, and that somehow inspired this dish.  I nixed pretty much everything about the recipe except the onions and mushrooms.  I also like to punch up the veggie, factor, so I thought some sweet peas and fresh asparagus would brighten the dish a bit.  And they delivered exactly as planned.  This risotto was a perfect transition between Winter and Spring.

Barley Mushroom and Spring Vegetable Risotto
Adapted from this article


4 TB olive oil, divided
2 yellow onions, thinly sliced
3oz prosciutto
2 shallots, finely chopped
5 cloves of garlic, minced (divided)
2 cups pearl barley
1 cup red wine
6-8 cups chicken or vegetable stock
1/4 cup Parmesan cheese
salt and pepper to taste
2 portobello mushrooms, chopped
1/4 cup balsamic vinegar
1/4 cup extra virgin olive oil
1 TB fresh thyme, chopped
2 TB dry sherry
1 bunch of asparagus, roughly chopped
1 bag of frozen peas, thawed and drained


1. Heat a small saute pan over medium-low heat and add 2 TB of olive oil.  Add the onions and let cook over gentle heat until caramelized, about 40 minutes.  Set aside.


2. In a medium bowl combine the mushrooms, balsamic vinegar, olive oil, thyme, and 2 cloves of garlic.  Let the mixture sit for about 15 minutes to marinate.


3. In a large pot heat the chicken or vegetable stock so it is at a bare simmer.  You want to keep it hot for the risotto, but not cooking.


4. When mushrooms have marinated, place the mixture in a small saute pan over medium-high heat.  Add a pinch of salt and cook until mushrooms have released their moisture.  Add the sherry (or you could substitute red wine in this step if you don't want to use two different kinds of liquor) and continue cooking until mushrooms are soft and marinade has cooked down, about 15 minutes.  Set aside.


5. Heat a large saute pan over medium heat and add the remaining 2 TB of olive oil.  Add the prosciutto and cook until the fat starts to render, or a few minutes.  Add the shallots and cook until soft, about 3 minutes.  Add the remaining 3 cloves of garlic and cook for another minute.  Add the barley and toss to coat in the oil.  Let it toast for a minute, then add the red wine. Deglaze the pan if any good bits are stuck on the bottom of the pan and simmer until the wine has almost completely cooked away.  Add the stock 1 cup at a time.  Stir continuously, adding the next cup as soon as the previous cup is absorbed and cooked away.  Do this until the barley is cooked through.  It took me about 6 cups. 


6. Add the asparagus and peas, and cook to soften, about 5 minutes.  Add the Parmesan cheese and stir until it is melted and incorporated.  Stir in the reserved mushrooms and caramelized onions.

Thursday, March 18, 2010

Wildflowers and Cookies

 The recipe for these is in this post, I promise!

I always try and keep a positive attitude.  Emphasis on try.  I have a lot to be happy about right now.  Sure I'm getting fired next Tuesday, but my sister will be in town with my nephew all week!  I am having my cousin over for a dim sum dinner (oh, you know there's going to be a ton more on that later).  And, best of all, it's Spring!  It's hard to tell it's Spring in Southern California.  There isn't really Spring weather, per se.  It's the period between Winter and Summer when the weather can't make up its mind.  One day it'll be raining (ok, slightly drizzling), overcast, and cold, and the very next day will be all sunshine and blue skies.  Then three days later the drizzles are back, etc.  It goes back and forth like this until the weather settles on hot.  The big Spring indicator I've found is the flowers.  They're in bloom!  Well, ok, also, there are these two ducks that keep, ahem, "coupling" in the pool in my complex.  Yeah, that's also how you know it's Spring. Nature has its tells.
I tried not to interrupt this guy's lunch

 The leaves on this flower looked like little butterfly wings

Anyway, back to flowers.  The weekend before last, as my new thing for March, I drove out to the dessert with a friend of mine to check out the wild flowers that were just coming into bloom.  They would have been even better this last weekend or this coming weekend, but we were both busy the whole rest of the month.  But there was still plenty take in and enjoy and photograph!  I had never been out there before, and it was beautiful!  Definitely worth the drive!  Husband had a conflict and couldn't make it.  In hindsight that's probably a good thing.  He would have been bored sitting in a car for a few hours, only to watch my friend and I wander around off the side of a dirt road, snapping pictures of itty bitty flower buds. Not exactly his thing.

A lot of the flowers were just showing signs of wanting to bloom

You know what is Husband's thing?  Cookies.

See what I did there?  That's called a transition.  Guess you could say I'm good at them.  Creative at least.  Good at attempting creativity?  Yeah, we'll go with that.

Anyway, I've had a lot of time on my hands, and depressed, and...you know what?  Whatever!  You don't even need a reason or excuse or logical thought in order to make oatmeal cookies.  These are whole grain, baby!  They have dried fruit and vitamin C!  And actually, for cookies, they're pretty light on butter and sugar.  Indulgent dessert these are, for certainly, but nutrient void?  Certainly not!  And more important: really freaking delicious! I brought some of these into work (give them a taste of what they'll be missing when I'm gone!  Ha!  Ok, the people I share food with aren't the people in any way involved in staffing decisions, which is the only reason Husband allowed me to share them in the first place.), and I got ton of compliments on how chewy and flavorful they were.  One person said she doesn't even like oatmeal cookies, and she loved these.  Another co-worker was inspired to go home and bake her own batch that very same day, after I told her my trick for thick and chewy cookies. I'm going to miss having people to feed.


Chewy Oatmeal Chocolate Chip Cherry Coconut Cookies

Heavily adapted from The Go Lightly Gourmet

Makes about 24 cookies

1 cup dried cherries (or cranberries), chopped
1/2 cup orange juice
1 TB Grand Marnier (optional)
1/2 cup white sugar
1/2 cup brown sugar
1/4 cup butter, at room temperature
3 TB honey
1 egg, at room temperature
1 1/2 cups whole wheat flour
1 tsp baking soda
1/2 tsp baking powder
1/2 tsp salt
1/2 tsp cinnamon
1 tsp vanilla extract
1 TB orange zest
3 cups old fashioned oats
3/4 cup chocolate chips
1/4 cup shredded coconut

1. Preheat oven to 350 degrees.

2. In a small bowl, combine cherries, orange juice, and Grand Marnier (if using).  Set aside.

3. In a stand mixer, cream the butter and sugars until light and fluffy (about 3 minutes on medium speed).

4. In a medium bowl, whisk together the flour, baking soda, baking powder, salt, cinnamon, and orange zest. Set aside.

5. Once the butter mixture is creamed, turn the mixer to low and add the honey, then the egg, then the cherries (with juice), and finally the vanilla, waiting for each ingredient to fully mix in before adding the next.

6. Add the flour mixture to the sugar mixture and mix until just barely incorporated.  Fold in the oats, chocolate chips, and coconut.

7. Spoon the dough onto cookie sheets, about 1 TB per cookie (I used a 1 1/2TB disher...love those!).  Space them about 2 inches apart.  Gently press each ball of dough with your fingers, or the back of a spoon, until slightly pressed down.  Move the cookie sheets to the refrigerator for 20 minutes (or the freezer for 10 minutes).** 

8. When dough is chilled, move cookie sheets to the oven, and bake for 8-10 minutes, or until cookies are set and starting to turn golden brown.


**Alternatively, if you don't have fridge space, chill the dough in the bowl prior to spooning it out onto the cookie sheets.  I prefer to chill it after spooning so I know it's cold when it goes into the oven.  The point of chilling the dough is so it doesn't spread too much during baking, keeping them thick and chewy.


Aside: This recipe would be perfect alliteration, if only oatmeal started with a C!  It is henceforth known at coatmeal!

Wednesday, March 17, 2010

Try My Go-To Soup!


I am officially in love with this soup. It's extremely easy and fast. Just saute some onion, throw everything in the pot, blend, and enjoy! It keeps well. In fact, it tastes better the next day, when the flavors have had time to get to know each other. It's healthy. A ton of green vegetable, and protein and fiber galore! It's filling. And best of all, it's delicious!

Not to mention, extremely adaptable. I used prosciutto because I had it on hand, but bacon or pancetta would have worked just as well. Or skip it all together for a vegetarian version. You could use onion instead of shallot, leave out the sherry if you're not a booze hound like me. Use any kind of bean that tickles your fancy, same for the cheese. In fact, to completely change the flavor of the dish, just swap out the vegetable! I made a soup very similar to this once before with broccoli instead of kale. Just as delicious, but since broccoli tastes nothing like kale, it was like a whole new soup!

I used the ingredients I used here because I think they compliment each other well. Prosciutto, shallots, sherry, and sharp cheddar cheese go together like...me and food! The cannellini beans give a creamy flavor and texture. But my favorite part is the kale. I was surprised, since it was pureed into minuscule bits, that it could still have what I would call a bite to it, but it did! This wasn't some vegetable thrown in to make me feel like I was being healthy by eating my vegetables. Kale is still very much the star in this soup, which I like because kale is delicious!

Also, did you know that studies have shown that if you start a meal with a broth-based soup you're more likely to eat fewer calories for that meal because the soup fills you up? Bonus!


Kale White Bean and Cheddar Soup
heavily adapted from Food Network

2oz prosciutto, chopped
3 shallots, chopped
3 cloves of garlic, minced
salt and pepper to taste
1/4 cup dry sherry
1lb kale, stems trimmed and chopped
1 14oz can cannellini beans, rinsed and drained
4 cups chicken broth
1 cup sharp cheddar cheese, shredded

1. Heat large pot or dutch oven over medium heat with 1TB of olive oil. Add the prosciutto and cook until some of the fat releases, a minute or two. Add the shallots and cook until softened, about 5 minutes. Add the garlic and cook for 1 minute. Add salt and pepper to your taste.

2. Add the sherry, and deglaze the pot. Wait until it has mostly cooked away, then add the kale and let it cook down for a few minutes. If necessary, add the kale in batches, letting the previous batch wilt down a bit before adding the next. Add the beans.

3. Stir in enough chicken broth for desired consistency. All 4 cups yielded a rather thin soup, which is what I wanted at the time. Bring soup to a boil and let simmer for 10 minutes.

4. Remove pot from the heat and let it stand for a few minutes to cool. Use an immersion blender or a regular blender to puree the soup. Return the pureed soup to the pot and add the cheddar cheese, stirring until it is melted and incorporated.

Ugly Delicious Is The Theme

Last week (that's right, I'm only a week behind now!), I made some pretty ugly, but pretty delicious food. I've noticed I've really been putting my own spin on most recipes I use now. I have the recipe in mind at the store and just go with whatever looks good. Ever so slowly, but surely, I am learning to trust my own ability to throw a descent meal together. However, I haven't quite worked out all the aesthetic aspects. I give you exhibit A:

Please, avert your eyes

Erm. Hey look! Cauliflower! A food stylist I am not, but it tasted divine. I'll have to work on presentation. Here's what I ate last week:

  • Spinach, sage, and prosciutto stuffed pork, courtesy of My Kitchen Addiction. For whatever reason my grocery store only sells tiny pork tenderloins. They are usually about a pound, if that. That's small, right? I ended up making two, just so there would be enough for the week. I kind of royal f-ed up this dish. I didn't pound out the pork thin enough. Definitely make it as thin as you can! As a result, my pork wasn't all beautifully wound like Jen's. I also blame the fact that the tenderloin was long and thin, and that definitely hindered it's roll-ability as well. I also may have forgotten a bunch of ingredients in the spinach mixture. Like, say, the breadcrumbs and eggs. Oops! I (on purpose, I should clarify at this point) used feta cheese instead of ricotta because it was a little healthier and just sounded yummy at the store. I also used more like 1/4 cup because I wanted the filling to be mostly spinach with a little cheese for flavor. Oh yeah, I also just about quadrupled the spinach, but I also wanted extra, since I had two pork tenderloins instead of one. I also didn't quite bake it for long enough. The thermometer said it was done, but then I cut into it, and it wasn't quite. That ended up being perfect because it was for lunches, which I always nuke first anyway, so it meant the pork was perfectly done after being reheated, rather than over-cooked. And even though it was undercooked and missing some ingredients, and other mishaps that I don't want to talk about...it came out really freaking good! That's a testament to the recipe, I guess. More or less get the ingredients together and they'll sing. Heh. The pork was tender and moist, the spinach went seriously well with it. And the prosciutto was crispy and delicious, as it should be! Don't let my failure scare you off. It was actually pretty simple to make if you use half your brain, which apparently I was not apt to do.
Ugliest most delicious bit of food there ever was

  • Barley risotto with mushrooms and spring vegetables, courtesy of me! Recipe to follow. Oh man, this was good. This was my first attempt at non-arborrio risotto, and it came out just like it should!
  • Kale, white bean, and cheddar soup, courtesy of me again. Recipe to follow shortly. I have a theory that you can pretty much combine cannellini beans, sharp cheddar cheese, and any green vegetable to get the most delicious and healthy soup ever.
  • And technically I made these blueberry crumb bars, courtesy of Smitten Kitchen, ages ago, but they never quite fit into any of my posts previously, so I'll stick them here. They had a 1lb container of blueberries on sale for $6 at Trader Joe's. You can't not buy blueberries for that price. And you can't not bake when faced with that many berries of any kind. I'm pretty sure it's a law of nature or something. These were fantastic. Sweet, buttery, crumbly, delicious!
Hellllllloooooo beautiful!

Monday, March 15, 2010

Recipe: Booze Cake

Booze Cake!!! I am finally sharing it with you!

Ok, so here's the deal. Last week, I got some bad news. As you may recall, late last year I was laid off from my job. I was given 60 days notice, and in the course of those 60 days I ended up finagling my way into some work and my company rescinded my notice. Yay! I was able to move to a new program, and without boring you with specifics, I'll just tell you that last week we found out this program is kaput. So there is a 99.99999% chance I am going to be laid off. Again. Next week in fact. When I found out, not surprisingly, I was a little depressed. I went home, and I tried to decide between baking and drinking, my two favorite past times (ok, actually my two favorite past times are eating and drinking, but you have to bake to eat in my world), and in the course of events Booze Cake was born!

It really was based on a number of things swirling through my mind at the time. I had bought two tubs of sour cream at the store because they were super cheap and I wanted to use some of it up, so I got to searching sour cream coffee cakes. I looked at a bunch, but they didn't quite have what I wanted. I wanted crunchy nuts and something sweet throughout. Then I found this one, courtesy of Noble Pig. It had almost everything I wanted: soft, cakey, crunchy, sweet. But I wanted something more. Booze. I am a lout, after all. So I...worked it in...in a number of places. This cake is strong, which is exactly what I wanted. I think with some tweaks, it could be a real winner for parties or just when I'm having a bad day. Make no mistake, this ain't called Booze Cake for nothing. It took me to my happy place. Of course, you can always show more restraint than I am capable of. I myself have no shame. The real knock-you-out-er is the bourbon in the icing. That doesn't get burned off in the oven. I did that on purpose. I wanted there to be actual alcohol in this cake. I didn't want a bourbon-flavored cake, I wanted a cake laced with bourbon. Oh yeah. And hey, I may sound like a total lout, but a slice of this cake and a glass of wine is way better for me than doing shots in a bar, right?

Overall, Booze Cake is a sour cream coffee cake with liquor-soaked dried fruit and chocolate chips, laced with bourbon, and topped with a walnut, chocolate topping and a bourbon icing. Yeah, you might need to read through all that again to make sure you didn't miss anything.

I made this in a bundt pan because, well, I was a dork. Next time I would just use a cake pan and put the walnut topping on top, rather than on the bottom. It still tasted great, but it didn't give me quite the crunch I wanted. So this recipe is for how I should have done it. And without further adoooooo, I give you Booze Cake!


Booze Cake
heavily adapted from Noble Pig

Cake
1/2 cup dried cherries
3 Tablespoons Grand Marnier
2 large egg whites (1/4 cup)
1/3 cup (packed) golden brown sugar
Pinch of salt
1 1/2 cups coarsely chopped walnuts
1 cup mini bittersweet chocolate chips, divided
2 cups cake flour
1/2 teaspoon salt
1/4 teaspoon baking powder
1/4 teaspoon baking soda
1 cup sugar
1/2 cup unsalted butter, room temperature
3 large eggs, room temperature
1/4 cup bourbon or whiskey
3/4 cup sour cream

Topping
1 Tablespoon bourbon or whiskey
3/4 cup powdered sugar
2 Tablespoons sour cream
Milk

  1. Preheat oven to 350 degrees, and prepare a 9x9 cake pan with non-stick spray.
  2. In a small bowl combine the dried cherries with the Grand Marnier and let them soak while you put the rest of the cake together.
  3. In a small-ish bowl, mix the egg whites, brown sugar, and salt. Mix in walnuts and 1/4 cup of the chocolate chips. Set aside.
  4. In a medium bowl, sift the flour, salt, baking powder, and baking soda together, and whisk until blended.
  5. In the bowl of an electric mixer, cream the butter and sugar until light and fluffy, about 3 minutes. Add the eggs, one at a time, then the bourbon, and mix until combined.
  6. By hand, stir in flour mixture in 4 additions, alternating with the sour cream in 3 additions. Stir until just barely incorporated. Make sure not to over mix.
  7. Fold in remaining chocolate chips and dried cherry mixture.
  8. Transfer batter to the cake pan and smooth the top. Spoon the walnut mixture over the batter in an even layer. Bake for 45 minutes to an hour, or until cake tester comes out clean. Cool cake on a wire rack.
  9. For the topping, whisk the powdered sugar, sour cream, and bourbon in a bowl. Add milk on teaspoon at a time until it is thinned to your desired consistency. Then drizzle it all over the cake.


Notes on this recipe: The recipe calls for chocolate chips, but I actually used chopped up bits from a chocolate bar in the cake. I only have those huge bittersweet chocolate chips that Ghirardelli makes, and those worked fine in the walnut topping, but I didn't want giant hunks of chocolate in the cake.

Next time I might try a different coffee cake recipe, just to see if I can get it a little lighter in texture though overall the flavors were just what I wanted. I would keep all the extras in there, for sure. In fact, next time I think I'll try adding a little orange zest as well, just to see how that pairs with the Grand Marnier. The dried cherries laced with booze were so flavorful, the walnuts gave me the crunch I wanted, and the chocolate...well chocolate is always acceptable. Bourbon is my baking booze of choice. It's smokey and keeps its flavor well after the alcohol burns away.

Really, you could completely alter this to suit your own fancies. Any dried fruit would do. Cranberries and blueberries would probably work. You could use pecans instead of walnuts. You could use tequila or rum. But this Booze Cake is what tickles me.

And if you have occasion to try your own Booze Cake, I certainly hope it is under more celebratory circumstances than my own!

Friday, March 12, 2010

Recipe: Chicken Tortilla Soup

When I first started this blog, I made mention of my grandmother and my adoration for her soups. It's true. I was not just fond of Grandma's soup. I was obsessed with it. Ok, not really obsessed, but when I was a kid I was rather picky (or rather my family didn't share my taste buds, thus giving the appearance I was picky...though there was plenty I ate, granted there was plenty I didn't), so the fact that I loved Grandma's soup so much was often topic of conversation. One year my mom even gave me a book called Grandma's Soup. Ok, since I have always been a little food obsessed, I guess you could call it obsessed, since it was what I looked forward to most when I would go to Grandma's house.

I never understand the people who don't like hot liquids. I've known not just one person like this, but several. They don't like soup, or coffee, or tea, or anything of that sort. I am exactly the opposite. I love hot liquids! They warm. They comfort. They generally taste delicious. It baffles me. Ironically, one of the people I know like that used to work in a coffee shop. He loved the smell.

In junior high my best friend's mom would always jokingly call me a cheap date because when they would take me out to dinner with them I would invariably order soup and some kind of appetizer or salad. I didn't do it to be a considerate guest of their generosity. I did it because that's what I wanted most off the menu. I guess it was a win-win for both parties. You know, come to think of it, I still do that.

Somehow, I went a long span without much soup. I didn't eat the cans of Amy's low sodium lentil and vegetable I always have stashed in my pantry for emergencies (ridiculously healthy and delicious!). I didn't order soups out at restaurants because I stopped eating out much at restaurants. And I didn't make much soup at home. I don't know what was wrong with me. Maybe because it was summer? But it started before summer. And soup is still good in the summer. Whatever the reason, it seems to have cleared up on its own (yes, I liken it to a disorder or disease). I have been craving soups left and right lately. And if you haven't yet guessed from the title of the post (I know, I can be a bit too subtle sometimes), I'm going to share one with you now!

Even though I do different foods for lunch and dinner, I still like to have an overall theme to all the food I cook each week. Is that weird? Not only does it allow me and Husband to mix and match how we see fit, it also somehow feels wrong to have, say, Mexican food for lunch and Indian food for dinner. Ok, it's weird. I know. At least you don't have to live with me.

So last week I was craving Mexican, and soup, and so I did the natural thing and made a chicken tortilla soup. And I totally came up with the recipe on my own. No help. No stealing. No adaptation. But really, tortilla soup is ridiculously easy to make, so that's not much of a boast. I really wanted the chicken flavor to come through in this soup, so I used only the dark meat from a rotisserie chicken (you may recall I used the white meat in the Mexican lasagna).

My mother may have just fainted in disbelief upon reading that sentence, as I always hated chicken with a passion when I was a kid...and teenager...and adult...

I would definitely recommend using dark meat. This is a very simple soup that really counts on the flavor from the chicken. You wouldn't want to disappoint the soup now, would you?

Everything in the soup is standard fair: onions, jalapeno, Mexican spices, tomatoes, chicken broth, etc., except you'll notice I added a little brown rice. I didn't intend this, originally. I had about a cup of leftover brown rice from the Mexican lasagna, so I figured I'd go ahead and throw it in the soup with everything else. Heck, it's what my grandma would have done! And in hindsight, I was really glad I did. Both Husband and I agreed the rice was a great addition to the soup. It provided more substance and texture without really altering the flavor.

Definitely don't skip (or skimp!) on the lime juice and cilantro. The lime just takes the soup to a whole other level. It would be kind of ho-hum, but with the lime the flavors just really come together into all sorts of deliciousness. Promise. A ditto for the cilantro, but to a lesser degree, as it should be. Cilantro shouldn't be in your face. It would be rude.

I used crumbled blue corn tortilla chips and slices of avocado for the topping. I have a serious relationship going on with blue corn tortilla chips. They are so tasty. As is avocado. Buttery and yummy. Sometimes garnishes are so worth it.


Chicken Tortilla Soup

makes about 8 servings

1TB olive oil
1 large yellow onion, chopped
5 cloves of garlic, minced
6 tomatoes, chopped
salt and pepper to taste
1/2 TB ancho chile powder
1/4 tsp cayenne pepper
1 tsp smoked paprika
1 tsp ground coriander
1 jalapeno, halved and thinly sliced
1 1/2 to 2 cups shredded chicken (I used the dark meat from a rotisserie chicken)
4-6 cups chicken broth
1 can pinto beans
1 cup cooked brown rice (optional)
juice of 1 lime
1/4 cup cilantro, chopped
crumbled tortilla chips
sliced avocado for garnish

  1. In a large pot or dutch oven, heat olive oil over medium heat. Add onions and cook until soft, about 5 minutes. Add the garlic and cook for 1 minute. Add the tomatoes and cook for another 5 minutes. Add the chile powder, cayenne, paprika, coriander, and salt and pepper, stir and cook for 2 more minutes. Add the jalapeno and chicken.
  2. Add the chicken broth, enough to get the consistency you want. I used the full 6 cups. Add the pinto beans and brown rice, if using. Bring to a simmer, then turn heat to low, cover, and simmer for 20-30 minutes.
  3. Stir in lime juice and cilantro. Sprinkle with crumbled tortilla chips and thin slices of avocado, or any garnish desired.

Wednesday, March 10, 2010

Craving Mexican

It's still cold and rainy, which apparently means I'm still craving Mexican food, or at least Mexican flavors. Mexican flavors are awesome! Smokey and spicy tones, from peppers and spices add a ton of flavor without making dishes heavy or fattening (depending on what you make!), which I am always a fan of. I had wanted to make this Mexican lasagna again ever since the first time I made it because, yes, it was that dang good. My only issue with Mexican flavored food is the vegetables. I have a hard time thinking of good, creative side vegetables that compliment the main dish. I think I was somewhat on the money this time, though I wouldn't say I stuck with any kind of Mexican theme. And that's a-ok by me.

Ooey gooey Mexican lasagna
  • Mexican lasagna, courtesy of the Pioneer Woman. My friend upon hearing about this dish described it kind of like enchiladas, which I think was right on. It's like enchiladas, but with more emphasis on the innards and light on the tortillas. And that's perfect for me because when I eat carb upon carb upon carb, it sends my metabolism into overdrive and I end up voraciously hungry in about 10 minutes. This unfortunately keeps me from most traditional Mexican food. Sad, but true. I wish I had taken a picture of a cut piece so you could see all the layers, but alas, I was too busy shoveling it in my mouth. Guess that means I'll just have to make it again sometime! I modified this recipe quite a bit, I'll try and make it presentable...
  • I replaced the processed starches with whole grain, so I used brown rice and whole wheat tortillas. There's so much flavor going on in this dish, it really wasn't a noticeable change, not that I would have minded the extra flavors. But if you're not into the taste of whole grain, I doubt you'll even notice the difference.
  • I halved the recipe (quartered the rice). I kind of eyeballed it while I was putting it together. I used a big roasting pan, just a tad bigger than a 9 x 13. I made it in my 9 x 13 last time I made it, so that would work too, but you really have to pack it down. This makes a ton of food, but don't worry, it'll disappear quicker than you think!
  • For the first layer I used, I think, about 1 1/2 cups cooked rice with 2 cans of black beans. Cooked in the onions and spices, it was some seriously delicious fare! I would reuse this Mexican rice recipe in other applications too.
  • For my cheese blend I used extra sharp cheddar and pepper jack. I've found sharp cheddar tends to be a bit lower calorie than other cheeses, but it packs a wallop of flavor, so I can also use less of it! I used, I think, a few ounces of the cheddar and a whole wedge of the pepper jack. In lasagna you can't skimp on cheese too much. I tried to be judicious.
  • Instead of beef I used shredded rotisserie chicken. I used the breast meat for the lasagna, and the dark thigh meat for another dish I'll be telling you about later. I think whatever meat you use, not a lot of the flavor will come through since there's so much else going on, so I went more for texture. The shredded chicken tasted great with it...err rather, a nice mouth feel? I hate that term. Ick.
  • I used one bag of frozen corn, as I try and stay away from the canned stuff.
  • I loved the addition of the cilantro on top. Don't skip this step if you can help it!
  • Whiskey glazed carrots, courtesy of the Pioneer Woman. Another recipe I've made before (with the lasagna in fact). I thought it worked well last time, so I decided to try again. You may recall I had some issues with the uber-gobs of butter and sugar used, so I decided to try it my way this time. To the called for 2-3 pounds of carrots I added 2 tablespoons of butter. One tablespoon when I cooked the first batch of carrots, and another when I cooked the second. When it was time to bring the sauce together I used 2 tablespoons of brown sugar. And of course, I used the full amount of whiskey called for, since that part never offended me. I loved this dish. The taste of the carrots really came through in a light, but still really flavorful and homey sauce. Now that I don't fear what this dish could do to my waistline I'll have to add it to the repertoire for sure. And I was lame and didn't get a picture of the finished product, but just imagine sliced carrot rounds glistening with a light drizzle of sauce, and you'll get the picture.
Collard greens with andouille, sherry, and almonds

  • Spanish collards with andouille sausage, sherry, and almonds, courtesy of bitchincamero. Melissa's version originally called for chorizo, which ironically is what turned me onto this dish in the first place, but my wonderful hippie store didn't have encased chorizo, only the loose stuff, which I didn't think would really work. But they did have some really gorgeous chicken and turkey andouille sausage that I thought would do as a substitute. I have no idea how this dish tastes with chorizo, but with the andouille, I fell in love. If you can believe it, I had never cooked with collard greens before. I know! I had only eaten them once before, at a bbq place, and they were nasty and overly salted. But these collards tasted like a chard, but with a bite, not a limp mess like spinach. A wilted green you can chew...but in a good way! Man, it was good stuff. The sherry and almonds were an awesome flavor compliment. This is one of those dishes that is so simple, both in ingredients and preparation, but is so delicious! I would highly recommend you try this recipe. It may not be Mexican (especially minus the chorizo), but I thought it still went well with the rest of the food.


And now some housekeeping items. I've been adding a recipe here and there to Tasty Kitchen, the PW's community website. If you're interested in being friends or checking out my recipes there (which are the same ones I've posted here), I added a badge in the right-hand margin which should link you to my profile there. If you haven't checked the website out yet, it's pretty neat!

Not to get all mopey on you, but remember when I was in need of self pity muffins a few months ago? Well I managed to dodge the bullet for awhile, and...let's just say there's a recipe coming up for a little something called booze cake. Yeah, the situation is that bad. I've got lots of time this week, so let's not rush into anything. It's coming, though, don't worry. And it is boozey!

Tuesday, March 9, 2010

Recipe: Turkey and Red Bean Chipotle Chili

Smokey and delicious chipotle chili

Shockingly, it's still cold and rainy (cold being, of course, a relative term). Some nights I open my front door to find a wet drizzle of rain pouring in front of me. The concept of being kept indoors because of inclement weather is definitely a foreign one where I live. It annoys me. But then I remind myself that I'm completely spoiled and I should quit complaining and appreciate the beauty this constant light stream of water has provided for the desert I live in. I've been hiking around the area a bit lately, and seeing rolling green hills dotted with sun-bleached rocks and boulders is one gorgeous sight! You know what I see in the summer? Dead, brown grass. Same color as the rocks. It's nothing special. Just desert. So I should enjoy this wet weather while I can, right? And anyway, it's called a drought and Southern California has been in one, well, forever. Again, desert. So keep it coming, rain! I'll take everything you got!

But all this cold, wet weather has kept me in the constant mood for rib-sticking comfort foods. A few weeks ago I wanted something with ground meat, and beans, and chipotle...definitely something spicy. Chili was the obvious choice. I hunted around for a recipe I liked, but nothing sounded quite right, so I decided to just make it up as I went along. Let me tell you, it turned out fantastic! I am definitely keeping this recipe in my back pocket for the next time the mood strikes. It was smokey and spicy and dense and sweet. I really liked the ratio of a little meat, some beans, and lots of peppers. I used dried kidney beans (my first time using dried beans!), and they were fantastic.

There something very important I need to discuss with you: chili powder. You know that generic chili powder you find in the regular grocery store? I can't really stand it. I don't know what's in it, but it never gives the type of flavor I'm looking for when I think chili (or chiles). So I've been buying ancho chili powder and chipotle chili powder either/both of which are far and away better than anything labeled simply as "chili powder". I resisted buying them for a long time because I didn't want to over-clutter my spice drawer, but trust me, it's worth the investment. You'll never go back to the old stuff!

I really debated whether to use turkey or beef in this chili. Husband was out of town, so his cholesterol concerns were for once not a factor. But I actually like ground turkey! I like beef too, but in the end I went with the turkey. You can really use anything you think will taste good.

You'll notice in the pictures I did a rare thing and added some garnishes to my chili. I'm not generally a garnish person, not because I don't like them, but because I'm lazy and it's usually too much effort and time standing between me and the food I want to devour. But in this case, the garnishes were necessary (and delicious!). See, I made the biggest rookie mistake in the book. What do they always say? Add heat slowly because you can always add it, but you can't take it away. Well I was a dummy. I was distracted, talking to Husband on the phone while throwing my chili together, and I wasn't exactly paying attention to just how many chipotle peppers I was putting in. See, they only sell that one rather large can of them at the store. Sure, it looks small in size, but when you open it up there are like 10 chipotles in there, at least! Once the can is open, you have to use them right? Because you can't just stick the can back in the pantry, and you can't let a single precious gem go to waste because that's a sin, right? When you get to this step in the recipe, take a deep breath and don't be afraid to walk away from the chipotles! I think I ended up adding about 6 of them. I really have no idea. I just kept, one at a time, pulling them out of the can, chopping them up, and throwing them in the slow cooker, always amazed that there were still so many left. Well when I finally got around to tasting the mixture, my mouth was on fire. Oops. I had hoped the cooking would mellow out the spicy, but no. This was chili caliente! But that's ok. You know how you tame the spicy? With garnishes! I'll bet you thought I was leading you on one big tangent never to return to the topic at hand, eh? Not so. Dairy is just about the only thing that help quell the fire in your mouth when you eat something spicy, and it just so happens that sour cream and sharp cheddar cheese go amazingly with chili. I added some chopped cilantro because I love it so, and voila! Perfect chili!

And for the record, extra chipotles can be used in a variety of ways: chipotle hummus or black bean dip, a southwestern omelet or frittata, Spanish rice, heck even another batch of chili!

Spicy chipotle chili with some much needed garnishes to cool it down

Turkey and Red Bean Chipotle Chili

1 yellow onion, chopped
4-5 cloves of garlic, minced
1 pound ground turkey, beef, or whatever meat tickles your fancy
1 TB cumin
1 TB ancho chili powder
1 TB chipotle chili powder
1/4 tsp cayenne
1 tsp smoked paprika
4 bell peppers, any color, roughly chopped
2 poblano peppers, roughly chopped
1 large can chopped green chiles
2 cups kidney beans (or 1 can)
1 28oz can diced tomatoes
2 TB tomato paste
3 chipotle peppers in adobo sauce, chopped (more or less to taste)
1-2 bottles of smoked porter or other smokey or full-bodied beer (I used Stone Smoked Porter)
salt and pepper to taste
cilantro, cheddar cheese, and sour cream for garnish

  1. In a pan over medium-high heat, saute the onion until soft, about 5 minutes. Add the garlic and cook for 1 minute. Add ground turkey and cook until browned and liquid has released and mostly evaporated. Add cumin, ancho chili powder, chipotle chili powder, cayenne, paprika, salt and pepper, stir to incorporate, and cook for a minute or two.
  2. Put turkey mixture in your slow cooker*. Add the bell peppers, poblanos, green chiles, kidney beans, diced tomatoes, tomato paste, chipotles, and enough of the beer until the mixture is thinned to your desired consistency. It'll thicken up a bit as it cooks, but I like it chunky, so I didn't add the whole bottle (I had one of those huge 22oz bottles, so it probably ended up being about a beer and a quarter), which left me the unfortunate task of finishing it right then and there. Cooking is tough, right?
  3. Turn slow cooker to low and cook chili for 7-8 hours.
  4. Garnish with chopped cilantro, cheddar cheese, and a dollop of sour cream (or sliced avocado, or whatever else you like).

*If you don't have a slow cooker, you can use a stock pot or dutch oven on the stove. Just keep the chili at a bare simmer and it does the same thing as a crock pot.


I also discovered an easy non-invasive alternative to collagen injections. You heard it here first, people! The first day I ate my caliente creation was for lunch at work. I didn't know just how spicy it was until I attempted to finish it. There may have been tears shed. I finished it alright, and then I went to laugh with my co-workers about my achievement. I expected everyone to comment on how red my face was, but I guess that's nothing they haven't seen before, my face turns red when someone says my name out loud. Instead one co-worker exclaimed that he could tell my food was spicy because my lips actually looked swollen. So there you go. You want to impress the guys with a fish mouth (something I never understood), just eat some super spicy chili!


The creamiest cornbread you will ever eat

I paired my chili with the most amazing cornbread I've ever eaten. Seriously, it is so freaking good. I wish I could link you the recipe, but I actually got it from Peter Reinhart's cookbook. I know! I actually finally tried a recipe from it! I wish I wasn't so busy this month because after how good this cornbread was, I can't wait to try the rest of the breads in this book. What makes it so much different than regular cornbread? Soaking the cornmeal in buttermilk overnight. It's so hard to describe the consistency of this cornbread, but soaking the cornmeal gave it a creamy, moist, cakey texture that, as the PW would say, made my skirt fly up! And by cakey, I don't mean it was airy and fluffy, it wasn't. It was dense like a good cornbread should be. But I mean it had the creamy texture of a cake, rather than the grainier texture that cornbread traditionally is. I never would have described cornbread as grainy before trying this recipe, but by comparison, it is. I can usually take or leave whole corn kernels in cornbread, but in this one they provided a much needed texture balance. I did alter the recipe in one way. I left out the bacon and bacon fat. I'm sure it's even more delicious with it, but it sounded heavy. I just greased the pan with butter instead.

Monday, March 8, 2010

Accidentally Antisocial

Ooooh yeah, read on

A few weeks ago I had cause to commute to my company's new building that is very far away from where I live. I'm on the program that runs out of that new building, but it's been a recent thing and I never permanently relocated down there, which was fine by me because I currently live about 5 minutes from where I work and I love it! The idea of commuting 30 miles everyday is not as unsavory as being jobless, but it's definitely not high on my list of likes. But I had a training class at that location a few weeks ago, and was obliged to spend a couple of weeks at the new office with my somewhat new co-workers. A couple of them, being welcoming and friendly (what a concept!), asked me to go out to lunch with them, touting the plethora of delicious eateries in the area. It was probably wrong to do so, seeing as how it was an opportunity to build relationships with the people I've been working with, blah blah blah, but I turned them down.

You see, I was really looking forward to eating my lunch, and the prospect of going out to some local sandwich place or taco shop instead was just unacceptable! If given a choice between that and Moroccan meatball stew over curried lentils and sweet potatoes with a miso carrot slaw on the side, which would you have chosen? My lunch, right? Right. Let me tell you all about it.

Heavenly Moroccan meatball stew
  • Moroccan meatball stew, courtesy of The Noshery. This was one of those recipes that I saw and immediately had to make. It sounded amazing, and really, did not in any way disappoint! The broth was the perfect mix of sweet and savory with the cinnamon, turmeric, and saffron. The meatballs were flavorful delicious, I especially loved the fresh cilantro in them. And the carrots and spinach gave a nice contrast. I am definitely making this dish again and again. That much flavor can't be denied! And also, it's easy to make. Sure, there are steps, meatballs are always a pain to roll out, but definitely doable.
Ugly picture, but delicious curried lentils and sweet potatoes
  • I served the stew over curried lentils and sweet potatoes, courtesy of Smitten Kitchen. There wasn't as much rhyme or reason I usually give to my side dishes. I knew I wanted to use something more nutrient dense than brown rice, and I had some beautiful French lentils from the farmer's market, and Trader Joe's sells those dang handy 2lb bags of sweet potatoes. I saw this recipe and thought the flavors would go well with the stew, and they did! If anything, they blended too well together and I couldn't really tell where one dish ended and the other began. But that's ok. As long as what I was eating was delicious, I was happy. There's really nothing to dislike about this dish. I absolutely love lentils, I love sweet potatoes, I would die for kale (which I seem to remember using instead of chard because we've just been getting some amazing local kale at my hippie food store), and I could eat curry flavored anything all day. So yeah, make-again-able for sure.
  • As the vegetable accompaniment, I made a miso carrot slaw, courtesy of Smitten Kitchen (all the way at the bottom of the post). I've made this slaw before, and it's delicious. I just finely chopped some red cabbage and tossed it with the miso carrot dressing. There's something so satisfying about topping a vegetable with a vegetable. The flavors weren't Moroccan per se, but they were light and sweet, and I thought they went well together, especially the carrot.
  • I sopped it all up with some Tibetan flatbread, courtesy of La Fuji Mama. This stuff was seriously easy to make, and it was pretty tasty, though it was a bit dense. If it were just the stew and this flatbread, that would have be best, but with the lentils and slaw...it was just too much food. I only had one quarter of the piece of bread, and even that much totally stuffed me. I ended up not making more when I ran out later in the week just because it wasn't really needed. Another time (with less food), I would definitely make this again.
Do you see what I mean about blowing off my co-workers? Who would turn down that amount of yummage? And believe me, it was yummage indeed.

  • For dinner I made a fennel and lemon slaw, courtesy of The Kitchn that I thought was just ok. Fennel and radicchio are both big flavors, and the dressing was a bit too light to go with it, and it was far too tart with the lemon juice and vinegar. I would consider trying this again with just some cabbage and using just a little dressing a bit heavier on the oil, but I would probably just try another recipe.
Ooey gooey Mexican macaroni and cheese
  • The real dinner star was my Mexican macaroni and cheese, which I adapted from The Chef and Photographer. I loved this recipe because it's so adaptable, and it replaces a lot of the cheese and cream with low-fat alternatives, but it still tasted amazingly creamy. Like, it tasted completely sinful. It's definitely not sin-free, but it didn't taste like I was eating mac and cheese with lowfat cottage cheese and sour cream. I know some people don't like the taste of either, but really it took on the flavor of the cheese, and the cottage cheese and sour cream just added creaminess from a texture standpoint. I made it Mexican by using pepper jack cheese and adding chorizo, jalapeno, and bell peppers (and mushrooms and spinach for some extra veg). I also used whole wheat pasta and whole wheat panko bread crumbs. Seriously, they are the best thing ever. Taste just like the regular stuff! This mac and cheese was fantastic. Spicy, peppery, creamy...what's not to like? With a few dabs of hot sauce on top Husband and I were in heaven! I doubled the recipe (used a full pound of pasta), and it filled both my casserole dishes (one 9x13, and one size smaller, I have no idea the dimensions, but it fits right inside the bigger pan). Oops! Next time I'll definitely go with her recipe. I'm guessing that would fill a 9x13 pan, which is plenty for dinner for the week! The best part is I can use this recipe again and make a completely different mac and cheese just by adding different ingredients! I would highly recommend this recipe to people looking to lighten up their mac and cheese.


I'm still several weeks behind in sharing my cooking adventures. How does that always happen? Well there are a few more of my own recipes on the horizon. I've been Ms. creative extraordinaire in the kitchen lately. I can't wait to share it all with you! And unfortunately, it looks like I'll have nothing but time in the near future. That program I was telling you about? That one where I was dreading commuting not quite as much as being jobless? Well we didn't get the contract, so now I can go ahead and start dreading being jobless, since that's probably going to be happening some time next week. *sigh* Let's just say, there's a recipe for something I call "Booze Cake" heading your way.

Wednesday, March 3, 2010

Recipe: Thai Green Curry


Wow, I am so behind! It seems like a lifetime ago I made this curry. Have you ever seen a curry leaf? I have never seen one. I even trekked to the Asian food market a few weeks ago in search of them so I could try making curry from scratch, rather than using a dubious, unknown paste. But they had none, so dubious green paste it was! I will say, this turned out to be far and away the best curry I've ever made. The lemongrass really cinched it. It was my first time using lemongrass, and I'm really unfamiliar with it. It's pretty fibrous, so I'm pretty sure you're not supposed to eat it. Anyone know anything different? I ended up bruising it (breaking the stock with my fingers), and putting it in whole, and then I fished it out at the end. Unfortunately, it broke up during cooking, so fishing it out was kind of a pain. I think I need to find a better way.

I served this curry over brown rice I had cooked up with some of the first dashi I had left over from my miso soup, and also added some chicken I had cut into pieces, tossed in egg wash and corn starch, and then pan fried. I had got it into my head that 5 pounds of chicken was a good amount for Husband and I for the whole week. What can I say? I was tired of Husband gobbling up all the food before the week was done. I then got it in my head that I would cut, coat, and fry all 5 pounds of chicken, and split it between the curry and an orange chicken dish I also made. It took, I kid you not, hours. At one point I was on the verge of tears because it was getting so late and all I had accomplished was frying a few pounds of chicken, with a few pounds still left to go! I will never do it again, in such mass quantity anyway. It actually turned out delicious. But it was definitely one of my more bone-head moves. Time management is not my strong suit by any means!

It's worth noting that green curry paste is rather spicy, however the flavor does mellow a bit. When Husband and I tried the curry while it was cooking, I held off on adding more curry paste because we both agreed it was pretty darn spicy (a little too much for me), but the next day the flavors had married and the heat had dissipated (just a little bit). I still found it had a kick, but it was not longer a kick in the face. You might want to keep that in mind when deciding whether to add more curry paste to the dish. Husband was a little disappointed, but he still liked the dish either way.

Really this recipe could be modified for a super-easy weeknight meal. Keep the onion, garlic, ginger, and lemongrass, but for the rest of the veggies, you could always just use a frozen medley. They are already cooked, so there's a much shorter cook time. Just throw everything in the pan, add the coconut milk and curry paste and simmer for a few minutes. For some protein, you could pan-sear some tofu and throw that in. Just don't forget the lime and basil and the end. They really brighten the dish! For me, it's all about the water chestnuts. I love them (so moist and crunchy!), but for some reason never cook with them. Oh ho ho, is that going to change.


Thai Green Curry

makes about 8 servings

1 yellow onion, chopped
4 garlic cloves, minced
1 carrot, chopped
2 celery stalks, chopped
1 red bell pepper, chopped
10 oz mushrooms, sliced
1 stock lemongrass, bruised (break the stocks between your fingers)
2 TB ginger, minced or grated
1 cup frozen peas
1 can water chestnuts
1 can coconut milk
1 TB green curry paste
juice from 1 lime
1 handful basil leaves (preferably Thai basil), cut into ribbons
salt and pepper to taste

  1. In a large skillet over medium heat, saute the onion until soft, about 5 minutes. Add the garlic and cook for one minute. Add the carrot, celery, bell pepper, mushrooms, ginger, and lemongrass, until softened, about 10 minutes. Add the peas and water chestnuts.
  2. Add the coconut milk and curry paste, and stir to incorporate. Add more or less curry paste to taste, it's quite spicy, so go slow. Simmer mixture for 10-15 minutes until the sauce has thickened a bit.
  3. Stir in lime juice and basil. I served mine over brown rice with some diced chicken.

Two New Things

I accidentally stumbled onto a New Year's Resolution that I didn't even mean to make, but that I am totally loving and moving forward with full steam. Every month I do try two new things: something out and about where I live, and a meal out at a new restaurant. At the end of the year I will have tried 12 new things to do around the city, and hopefully eaten 12 awesome meals! This is preferably with Husband, but as he's been out of town so much, I'm not letting him slow me down! With the out and about part anyway. He refuses to miss the food portion of our journey.

In January we tried an eatery we saw on that Food Network show Diners, Drive-ins, and Dives. It was so awesome we've already been back a second time (and it's really far away!). For our outing we jogged together around a lake. Ok, we'd done that before, but never together, and we had some much needed us time.

In February we spent Valentine's day at a restaurant we'd both been to before, but not in several years. We had blacklisted it for years because we hated the snooty attitude we experienced there when we were young, lowly college students. But we decided to give the place another try and loved it. Our older, more experienced palettes could better appreciate just how good the food was, and our server was awesome. Either the snoot is gone, or we're just old enough not to warrant it. For the outing I hiked (which I posted about on my dog blog) a local mountain I never even knew was there. And because I'm a dork who likes extra credit, last weekend Husband and I went to an Italian place we drive by several times a week (it's right by Theo's doggy daycare!) but had never been to. We went with some neighbors of ours who are fellow Corgi owners. We also checked out a walking trail that's right across the street from our housing complex we had no idea was there. It's not as good as the other walking trails in the neighborhood, but in light of recent local events, those weren't available last weekend.

What's in store for March? There's a restaurant that opened early last year that we've been meaning to try, well, since it opened! This is the month we're finally getting off our butts to do it! And I'm hoping to get out to the desert to see some wild flowers this weekend, but the scheduling is tough, so I'm not sure if it'll work out. If it doesn't, well I just have no idea what I'll be doing. But I figure there are museums and parks to check out, botanical gardens, strawberry picking, and heck there are always more lakes to walk around and more mountains to climb.

Really, it's for fun, so there are no hard and fast rules. The intent is to get out and do things. It doesn't have to be new so much as special and eventful.


Anyone have an suggestions for general out and about activities? I still have ten to go!

Monday, March 1, 2010

Recipe: Miso Soup

miso soup

I have always loved miso soup. I never go to a Japanese restaurant and not order it. It's actually one of the reasons I married my husband. He thinks it's too salty, so he always gives me his bowl.What can I say, we're just compatible. In high school when my mom would go out of town for work (which was, at points, more often than anyone liked), my dad and I would go to the same small, neighborhood sushi place. It was our thing. We ended up there so often that the owner of the restaurant got to know us. She would always ask how we were, and when I went off to college, she would ask how I was. I always ordered their miso soup, and I always loved it.

Miso was always so mysterious to me. I loved everything flavored with miso, but I didn't really know what it was. And miso soup? Who knew what the heck was in that! All I knew was it was delicious, and that was good enough for me.

Well miso, if you don't know, is a paste made from fermented soy beans. There's white miso (which is really more yellow), red miso, brown miso, and probably some others. The color really just refers to their intensity of flavor. White miso is mild and smooth, while brown miso is a much stronger flavor. They sell 20 different varieties at my local asian food market, but they also carry it at the health food store.

Then there was dashi, the broth that miso soup is based around. I remember generally reading something about dashi being made with dried fermented fish something or other and was effectively scared away for a few years. But upon further reading, it's actually not that scary. It's a bit of a process, but dashi has just three ingredients: water, kombu seaweed, and bonito flakes (the nasty fish stuff I was talking about, but really, it's not nasty at all). Again, I found the kombu and bonito flakes at my asian market, but I've seen the ingredients at my local health food store, and the bonito flakes were at Whole Foods as well. They're those ingredients you never realize are there because you weren't looking for them. Really search the asian food isle next time you're at the store and you might be surprised with what you find. Then again, if you go to a big chain grocery store, you might not be. I'm always horridly disappointed by what they carry in the asian food isle at my grocery store. It's itty bitty!

So I've reached another point on my food journey. A few weeks ago I made my own miso soup that I think could rival that of any sushi joint in the area! I stocked it with a ton of tofu, seaweed, and scallions, which made it substantial enough for dinner when I paired it with a small salad. It was salty, and savory, and delicious! Husband even had a few bowls! It really amazes me how something with so few ingredients can taste so deep and complex. The real time commitment with this recipe is the dashi. You have to be near the stove to keep an eye on it, and you have to make first dashi and then second dashi. But once the dashi is done, it's a matter of minutes to whip up a bowl of miso soup for dinner every night. I highly recommend if you're in the mood for something light, healthy, and delicious.

What's this about first dashi and second dashi? Well basically you cook the kombu and bonito in water to release their rather strong flavors. This is first dashi. This isn't the stuff that miso soup is made of. It's too strong, so it overpowers the subtle white miso. But it does make an excellent general purpose broth. I used some to cook up some brown rice for a curry, and it gave the rice a great flavor. You cook a new batch of water with the left over kombu and bonito flakes, and the delicate broth you get from this second dashi is what you want to use for the soup. This is where I went wrong the first time I tried to make miso soup. I hadn't yet heard of second dashi. Also, I used red miso instead of white. Miso soup is delicate and needs to be treated with a light hand. Red miso and first dashi have their place in my kitchen, just not in my miso soup.

Don't be scared, give it a try!

Miso Soup
(dashi recipe adapted from Serious Eats)

For first dashi:

8 cups water
1 long strip of kombu (about 5x8")
1 cup tightly packed bonito flakes

For second dashi:

8 cups water
kombu and bonito flakes reserved from first dashi

For miso soup (one bowl):

1/2 TB white miso paste
1/4 cup cubed firm tofu
1 TB dried wakame seaweed
2 TB chopped scallions


For first dashi:

  1. Wipe off any excessive powder off the kombu with a damp paper towel. Some powder is desired.
  2. Put water in soup pot. (It's important to use water you would consider drinkable, as dashi is very delicate in flavor and bad tasting water will come through.) Add kombu to water and turn stove to medium heat. Slowly bring the water and kombu near to the point of simmering without actually letting the water boil. (This is important, as letting the water get that hot will cause the kombu to release icky tasting chemicals.) Using medium heat this should take about 10-15 minutes, depending how how cold the water was to start with (mine was chilled, so it took 20 minutes).
  3. Before the water boils, remove the kombu and reserve it for the second dashi. Keeping the water over heat, add the bonito flakes. Bring mixture to a boil, turn off the heat, and let the flakes sit in the water for about 2 minutes.
  4. Strain the mixture through a mesh strainer. Reserve the bonito for the second dashi.
  5. First dashi isn't used for miso soup, but it can be used in place of chicken, vegetable, or seafood stock in other applications.

For second dashi:

  1. In a soup pot, combine water and kombu and bonito flakes reserved from the first dashi. Again, make sure to use drinkable water.
  2. Heat mixture over medium-low heat at the barest of simmers for about 10 minutes. Like the first dashi, letting the water boil will result in icky dashi, so be diligent!
  3. Strain dashi through a mesh strainer, discard kombu and bonito flakes. Dashi should be a beautiful barely golden color.

For the miso soup:

  1. To prepare one portion of soup, fill a bowl with the second dashi made above. Add the miso paste, you can add more or less to your liking. I found 1/2 to 3/4 TB per bowl was a good amount. Whisk the miso around until it is incorporated fully into the dashi (it should look cloudy). Add tofu, wakame seaweed, and scallions. Give the seaweed a minute to rehydrate, then enjoy!
  2. You could always make this a more substantial meal by adding soba noodles and spinach.

Sunday, February 28, 2010

Seriously Citrusy

I never thought I'd be one for seasonal cooking, mostly because when I first started cooking, I was completely ignorant of what the heck foods you get in what the heck seasons. I know this will make some people want to reach through their computer and smack me, but living in California, I've always lived in close proximity to produce grown here in my state, as well as the stuff grown down in Mexico and Chile and other South American regions in our off-season. Blueberries, for example, never leave the grocery store. Sure, in the middle of January they cost $6 for the tiniest of containers, but they're there. When I wasn't cooking, I wasn't buying as much fresh produce, so I never really noticed when the produce was cheap vs. ridiculously expensive in the context seasonality. It's a bit pathetic, I know, but I have since developed a healthy respect for summer fruits, winter leafy greens, and everything in between.

What does that have to do with anything? Well I've been having a serious hankering for citrus the last few weeks, which, you'd never guess, is in season right now! Or at least, it was when I was actually making the things I'm about to share with you.

candied orange peels

First, I saw recipe after recipe for candied citrus peels, and decided to try it. Apparently the natural pectin in citrus peels, when cooked with lots and lots of sugar, become like a gummy candy. Neat, huh? I had to try this with orange peels because I used to love the orange gummy candies my grandma kept in her candy dish when I was a kid (you know, those ones that are shaped like an orange slice?), and it worked out because I also was making orange chicken later that day, so I used both the juice and the peel from the oranges. I'm so green!

Candying orange peels is quite an undertaking! I used this set of instructions, courtesy of I made that! First I peeled and cut the peels from about 8 oranges (it took a long time). Then, I boiled the peels in water and a ton of sugar. Now be careful here. Keep it at a very very gentle simmer. I let my liquid boil too violently and ended up with a hard sticky mess (which I rectified by adding more water to thin it back out). Then I parked the pot of peels in the fridge for 2 days (it took up more room than I would have liked). When they were good and soaked I dried them in the oven, over verrrrrry low heat. Then tossed them with sugar, and voila! Candied citrus peels!


I will say, this was not an easy recipe. There were a lot of steps, and as I found out, doing things not just so resulted in not exactly pristine results. But that's ok. I learned some valuable lessons I can employ next time around.

Overall these turned out pretty good. Texture-wise, they were perfect: soft and chewy. Taste-wise they were good, but some of the peels still hung on to a bit of their bitterness. I think that could be remedied with cooking the peels longer, and soaking them in the right consistency liquid. Basically, if I don't mess it up next time, they should come out a little better. Since it's the pectin in the peels that makes them gummy and delicious, fruits with a thicker peel come out yummier. I hear pomelos are actually the best citrus to candy.

meyer lemon marmalade over Greek-style yogurt

Next, when I saw the recipe from Simply Recipes on meyer lemon marmalade, I knew I had to make it immediately. First off, I am completely in love with meyer lemons. They are so sweet and mellow and citrusy and just delicious! Now jams vs. jellies vs. preserves vs. marmalades, etc. always confuses me a bit, but marmalade is made from citrus and includes the peels, so can have a bit of a bite to it that some don't like. But I like it just fine! Unlike my candied orange peels, this marmalade was easy and came out delicious! I've been enjoying a few spoonfuls on some Greek-style yogurt, and together they are heavenly! I highly recommend.

In this cold winter weather, I love the bight, light flavors of citrus to bring sunshine to my day.